Continuous Integration of PHP Project Using Shippable
Recently I started using Shippable as my continuous integration service. It adds a lot to peace of mind knowing that your tests are always run (even if you forget to do it on your local environment) and you have another point of failure for your application.
The biggest reason I chose Shippable is that it has a sane pricing. You get one concurrent build for free and this includes the private repositories. This works great for side projects which you don't want to make public, but want to use good tools without a lot of hassle. If the project picks up and you need more hamster power it's easy to ramp it up without having to sell a kidney or two. For those wanting to say that "We need to charge that much to provide good service" I understand that and I personally look with one eyebrow raised at software which is just free (business needs to make money to survive). Just that for simple side projects (hobby) that will probably won't bring even a dollar spending hundreds a month is not a best financial decision.
You can jump to any of the sections:
- Prerequisites
- Initial configuration
- PHPUnit testing
- Enable project in Shippable
- phpspec testing
- Behat testing
- Environment variables & MySQL
- Conclusion
Prerequisites
To start using this service you just need to sign up using your GitHub or BitBucket account. If you want to test private repositories you will have to give Shippable permission to them (by default it only sees public repositories). The code used in this article is available at GitHub. It's a Symfony project, but with small changes any PHP project could be tested.
Initial configuration
Your project needs to have a shippable.yml configuration file. In it you define scripts which will be run, environment variables, language, versions to test, etc.
First let's configure Shippable to test a PHP project and do it for 5.5 & 5.6 versions. Add the following to your shippable.yml file:
language: php

php:
    - 5.5
    - 5.6
Just in case it might be helpful to have the application log files (in case the build is failing and you're not sure why). You can tell shippable to save the artifacts from a build and make it available for download using the archive option. The shippable directory is a special one were all the files from build is being kept (like test coverage reports, etc.). Add the following to your shippable.yml file:
archive: true

after_script:
    - cp -r ./app/logs shippable/logs
This will create an archive for download after the build is done. The after_script is commands which are run after the build and they will not affect the status of the build.
To have our project working we need to install libraries using composer. First we update composer to have the latest version and then install all the required libraries:
before_script:
      - composer self-update -n
      - composer install --prefer-dist -n
PHPUnit testing
The AppBundle which comes with new Symfony project has a simple PHPUnit test. Add the following to run the PHPUnit tests:
script:
    - phpunit -c app --log-junit shippable/testresults/junit.xml --coverage-xml shippable/codecoverage
Commit the changes and push it to GitHub. Now that we have the basic set-up for Shippable it's time to add it to a service.
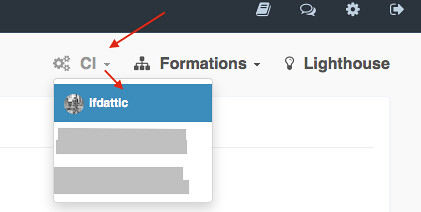
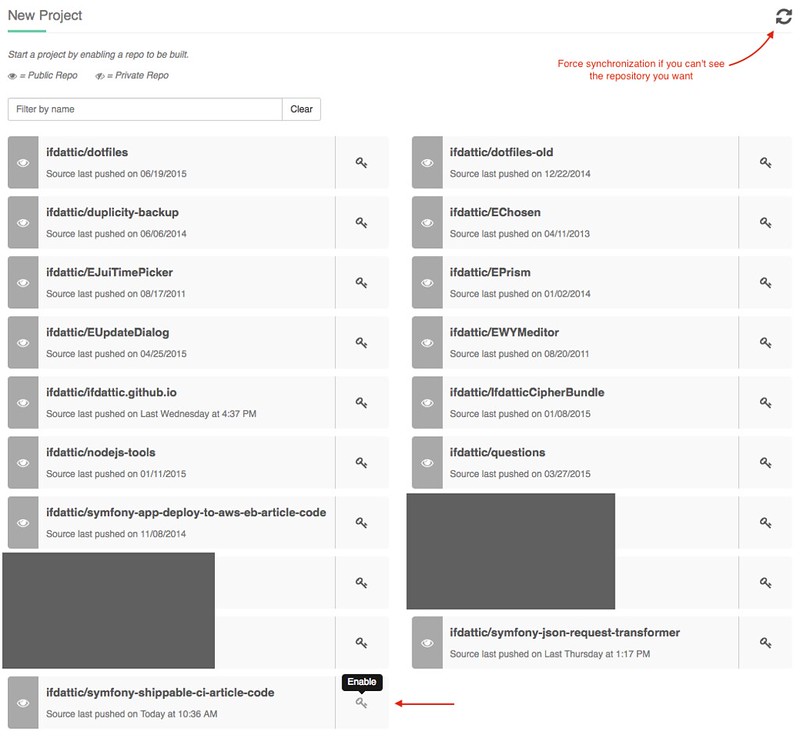
Enable project in Shippable
First choose the subscription to use and when in projects section click the big plus icon which says "Enable Project."
Force a synchronization if the repository you want is not in the list. Click on key icon to enable the project.
After it is done you can manually start a build or it will happen automatically the next time you will push a commit.
After a while a build should finish and you should get the similar view.
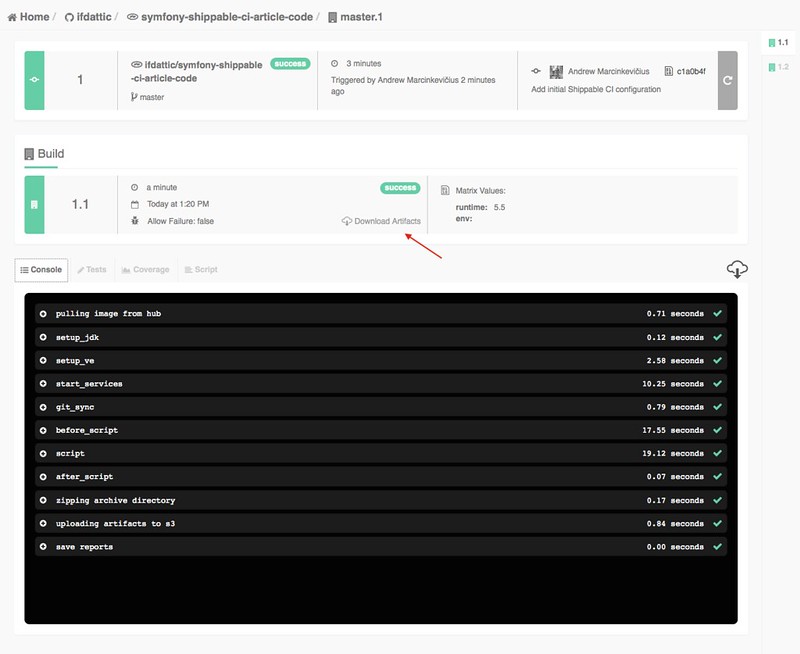
By clicking "Download Artifacts" you can download the logs & other files which were generated during the build.
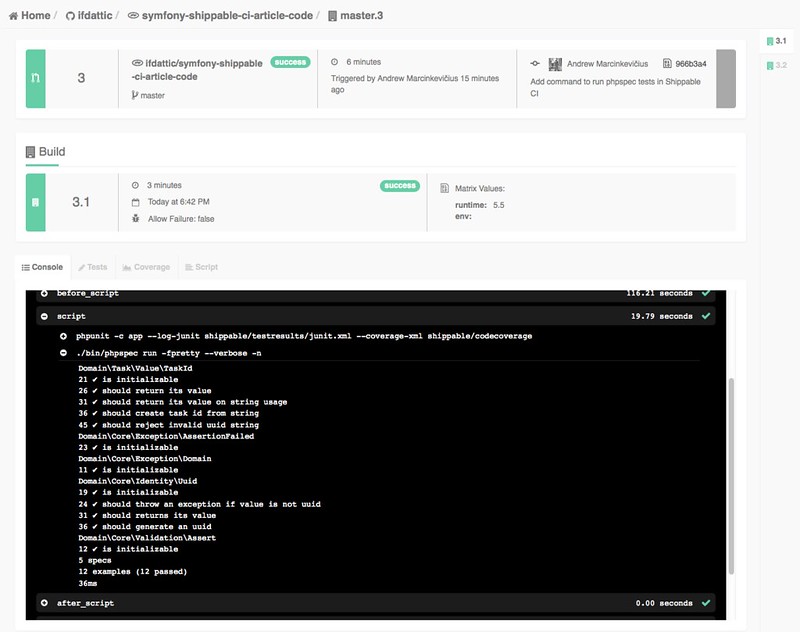
phpspec testing
Lets expand our testing suite with phpspec. You can see that code was added in this pull request.
To run phpspec tests just add a command to script in your shippable.yml file:
script:
    # ...
    - ./bin/phpspec run -fpretty --verbose -n
You should be able to see similar view if everything was correct.
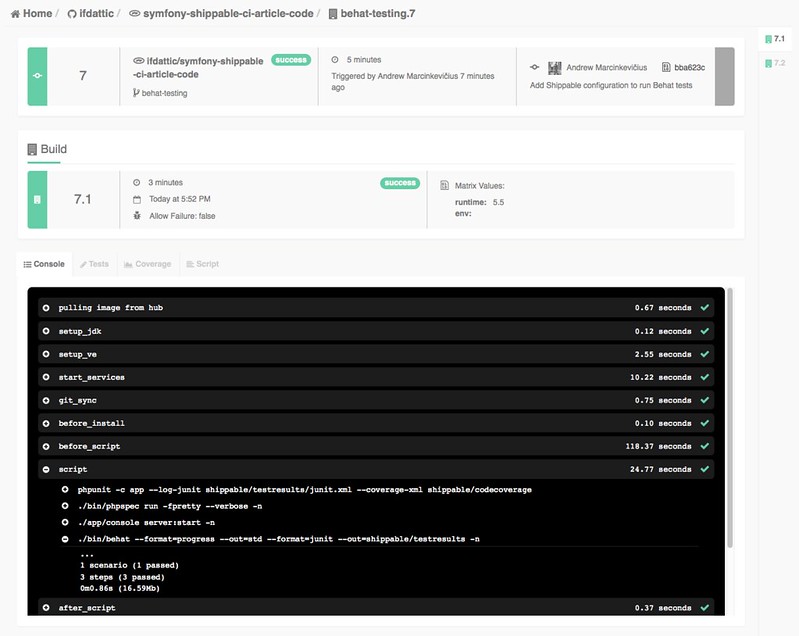
Behat testing
Lets expand our testing suite with Behat. You can see that code was added in this pull request. Please note that currently there is no tagged version of Behat (at the time of writing latest is 3.0.15) which has junit formatter, for that reason a dev version is installed.
To run Behat tests we will start the built-in web server & then run the tests. This can be done by adding following commands:
script:
    # ...
    - ./app/console server:start -n
    - ./bin/behat --format=progress --out=std --format=junit --out=shippable/testresults -n
After the tests are finished, stop the built-in web server:
after_script:
    - ./app/console server:stop -n
The default XDebug nesting level is set at 100 which is very small and throws a fatal PHP error. This can be fixed by setting it at higher level in php.ini file. Add the following to your shippable.yml file:
before_install:
    - echo "xdebug.max_nesting_level = 1000" >> ~/.phpenv/versions/$(phpenv version-name)/etc/php.ini
You should be able to see similar view if everything was correct.
Environment variables & MySQL
You will probably be using a MySQL or something similar for the persistence in your application. It's very easy to include services with Shippable.
You don't want to hard code configuration variables for your application. To fix that we will use the environment variables to configure the application depending on the environment it is in. You can set the global environment variables which are the same between builds and you can set simple environment variables which are different between builds (extending your testing matrix). If you have environment variables which you don't want to show (like passwords) you can add it as a secure environment variable.
You can see the code which was added in this pull request.
To get the secure environment variable you need to go to project settings. It has a panel "Encrypt Env Vars." You provide the environment variables in the box and after clicking "Encrypt" you get the snippet of code you can paste in your shippable.yml file.
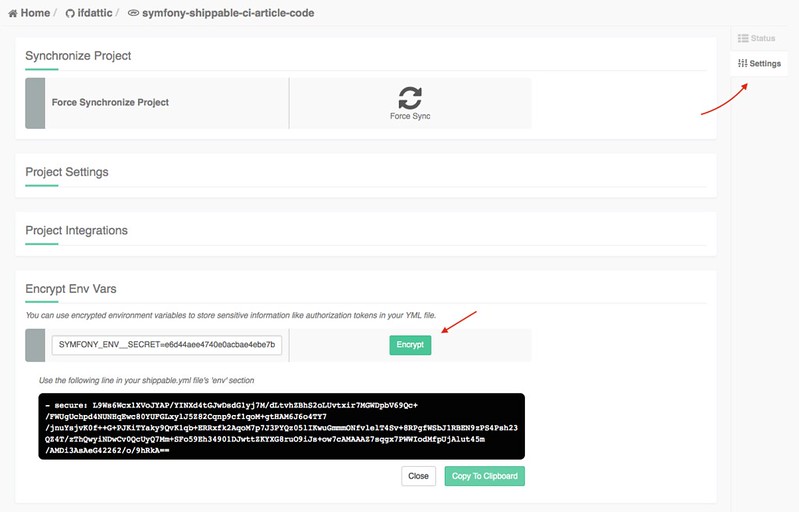
Environment variables which start with SYMFONY__ are converted to normal variables after composer finishes the install. The double underscore becomes a dot. The environment variable SYMFONY__ENV__DATABASE_NAME becomes env.database_name parameter in your application. Lets add the database configuration and a secret value:
env:
    global:
        - SYMFONY__ENV__DATABASE_HOST=127.0.0.1
        - SYMFONY__ENV__DATABASE_PORT=~
        - SYMFONY__ENV__DATABASE_NAME=symfony
        - SYMFONY__ENV__DATABASE_USER=shippable
        - SYMFONY__ENV__DATABASE_PASSWORD=
        # Secret parameter value
        - secure: L9Ws6Wcx1XVoJYAP/YINXd4tGJwDsdG1yj7M/dLtvhZBhS2oLUvtxir7MGWDpbV69Qc+/FWUgUchpd4NUNHqEwc80YUFGLxylJ5Z82Cqnp9cf1qoM+gtHAM6J6o4TY7/jnuYsjvK0f++G+PJKiTYaky9QvK1qb+ERRxfk2AqoM7p7J3PYQz05lIKwuGmmmONfvlelT4Sv+8RPgfWSbJ1RBEN9zPS4Psh23QZ4T/zThQwyiNDwCv0QcUyQ7Mm+SFo59Eh34901DJwttZKYXG8ruO9iJs+ow7cAMAAAZ7sqgx7PWWIodMfpUjAlut45m/AMDi3AsAeG42262/o/9hRkA==
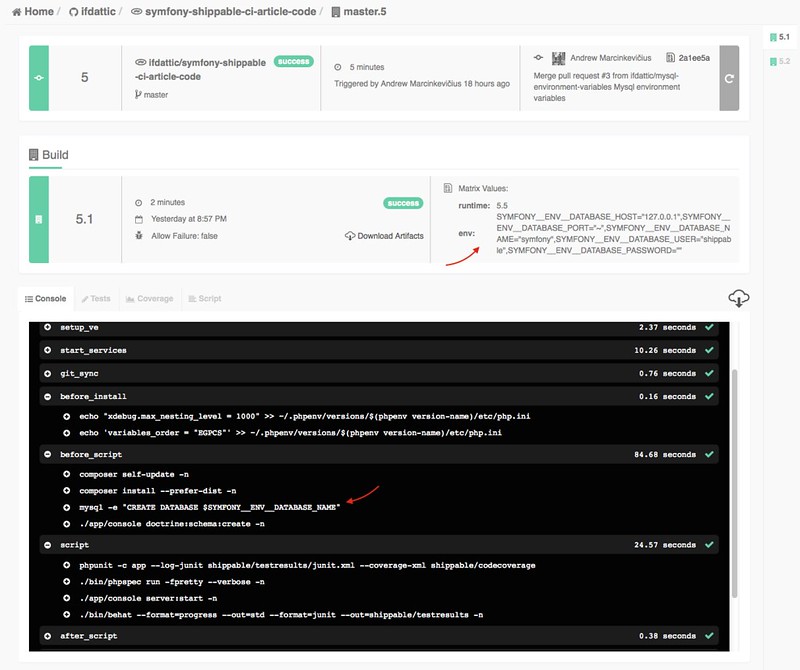
The MySQL database can be created by adding the command in before_script option:
before_script:
    # ...
    - mysql -e "CREATE DATABASE $SYMFONY__ENV__DATABASE_NAME"
    - ./app/console doctrine:schema:create -n
This will create the database as it's defined in the environment variable. After the database is created it will run the queries to create a schema for your application.
We're using built-in server for testing our application. However it has no access to environment variables. To fix that extend your php.ini configuration to include them (you probably won't need this if you're using Apache or different web server):
before_install:
    # ...
    - echo 'variables_order = "EGPCS"' >> ~/.phpenv/versions/$(phpenv version-name)/etc/php.ini
You should be able to see similar view if everything was correct.
Update 2016-04-27: In the new build systems MySQL is not started automatically. If you get an error ERROR 2002 (HY000): Can't connect to local MySQL server through socket '/var/run/mysqld/mysqld.sock' (2), enable MySQL in Shippable configuration file:
services:
    - mysql
Conclusion
With these small changes you should have a CI testing for your application. It will improve your code quality and give you a piece of mind knowing that the changes you made will be tested even if you forgot to run the tests on your development machine.