Continuous Integration of Node.js Project Using Shippable
A while ago I wrote an article how to use Shippable as continuous integration service for PHP project. This is similar article except that it is for a Node.js project.
One of the biggest benefits of Shippable is that you are able to test private repository before needing to pay for it (good for hobby projects which you don't know there they might lead).
You can jump to any of the sections:
- Prerequisites
- Initial configuration
- Environment variables & MongoDB
- Testing
- Update Node.js version
- Enable project in Shippable
- Code coverage
- Conclusion
Prerequisites
To start using this service you just need to sign up using your GitHub or BitBucket account. If you want to test private repositories you will have to give Shippable permission to them (by default it only sees public repositories). The code used in this article is available at GitHub. It's an Express.js project, but with small changes any Node.js project could be tested.
Initial configuration
Your project needs to have a shippable.yml configuration file. In it you define scripts which will be run, environment variables, language, versions to test, etc.
First let's configure Shippable to test a Node.js project and do it for 5.1.1 version. Add the following to your shippable.yml file:
language: node_js

node_js:
    - 5.1.1
To have our project working we need to install modules using npm:
before_script:
    - npm install
Environment variables & MongoDB
The application uses MongoDB for persistence. It's very easy to include services with Shippable.
You don't want to hard code configuration variables for your application. To fix that we will use the environment variables to configure the application depending on the environment it is in. You can set the global environment variables which are the same between builds and you can set simple environment variables which are different between builds (extending your testing matrix). If you have environment variables which you don't want to show (like passwords) you can add it as a secure environment variable.
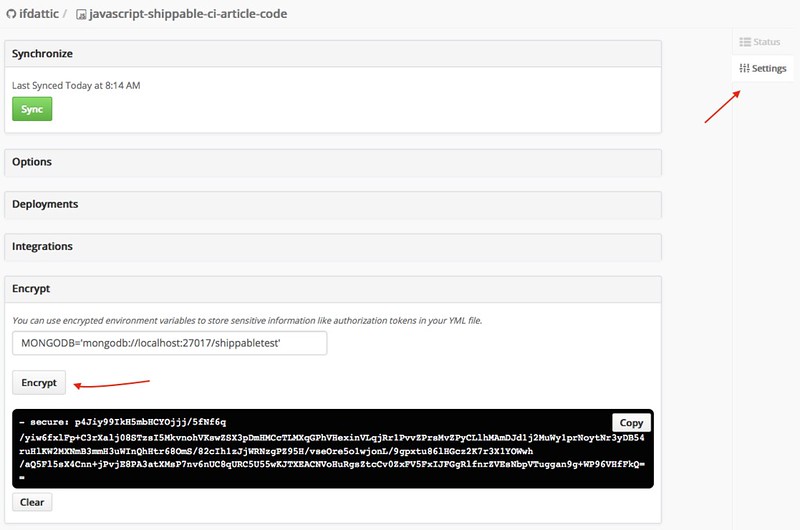
To get the secure environment variable you need to go to project settings. It has a panel "Encrypt." You provide the environment variables in the box and after clicking "Encrypt" you get the snippet of code you can paste in your shippable.yml file.
Then add the environment variable and MongoDB service to shippable.yml file:
env:
    global:
        - XUNIT_FILE=shippable/testresults/result.xml
        # MongoDB URL
        - secure: lPx/1fe8RFUSPv1F1D3Fujd14afop7NPSAF6IirmO4YbfRc3MkiTHbkSuiQzniOccC5TC2kd1//hdBd9vnSOCVpS1+3Xs4ZVKj8VfnN2nEokMTnHGYuwB36tW1js/u734NKBl+R5se+140bAORjcrpxcSyQjlDDCCdgZbx00M2FvX4kDPXtZ17z9h2eViC70im5q4qoapzsu1+6U6BjAYnF+QAGoxBe1X3FOjlOgRo/G4/Z6E8nVgNMnx5jqX380ImSC8Hsy7D8MX6U0NelnhjBSc3NrWVYbCNNYVWQA4Zw8aXlZzf3gPF0zhdGt1eBUPgNmxJyXCF4rxsfQjI99zA==

services:
    - mongodb
At the moment of writing there is issues while connecting to the default MongoDB service. If you have the same issue you might need to install the MongoDB manually. To do that add the installMongo.sh script to your repository:
#!/bin/bash -x

sudo apt-key adv --keyserver hkp://keyserver.ubuntu.com:80 --recv 7F0CEB10

echo 'deb http://downloads-distro.mongodb.org/repo/ubuntu-upstart dist 10gen' | sudo tee /etc/apt/sources.list.d/mongodb.list
sudo apt-get update
sudo apt-get install -y mongodb-org=2.6.11 mongodb-org-server=2.6.11 mongodb-org-shell=2.6.11 mongodb-org-mongos=2.6.11 mongodb-org-tools=2.6.11

sudo mkdir -p /data/db

# Pin the current version
sudo echo "mongodb-org hold" | sudo dpkg --set-selections
sudo echo "mongodb-org-server hold" | sudo dpkg --set-selections
sudo echo "mongodb-org-shell hold" | sudo dpkg --set-selections
sudo echo "mongodb-org-mongos hold" | sudo dpkg --set-selections
sudo echo "mongodb-org-tools hold" | sudo dpkg --set-selections

#replace closed port & bing IP
sudo sed -i 's/#port = 27017/port = 27017/' /etc/mongod.conf
sudo sed -i 's/bind_ip = 127.0.0.1/bind_ip = 0.0.0.0/' /etc/mongod.conf
sudo sed -i 's/# nojournal = true/nojournal = true/' /etc/mongod.conf
sudo sed -i 's/#noprealloc = true/noprealloc = true/' /etc/mongod.conf
And extend your shippable.yml with:
install:
    - . installMongo.sh
    - sudo mongod --smallfiles > /dev/null &
Testing
The tests are run through custom npm script. Add the following to run the tests:
script:
    - npm run shippable
Update Node.js version
At the time of writing Shippable doesn't provide Node.js versions 4 or higher. To fix that add the following which will update and NVM and install the correct Node.js version.
build_image: shippableimages/ubuntu1404_nodejs

before_install:
    - sudo apt-get install -y --force-yes build-essential
    - curl -o- https://raw.githubusercontent.com/creationix/nvm/v0.27.1/install.sh | bash
    - source ~/.nvm/nvm.sh && nvm install $SHIPPABLE_NODE_VERSION
    - node --version
Enable project in Shippable
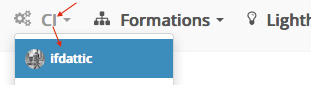
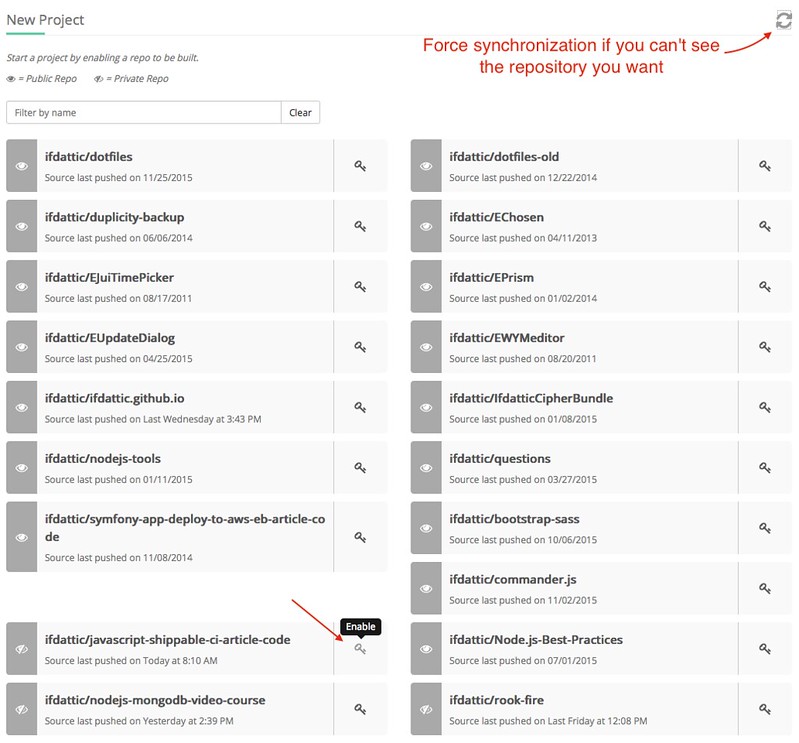
First choose the subscription to use and when in projects section click the big plus icon which says "Enable Project."
Force a synchronization if the repository you want is not in the list. Click on key icon to enable the project.
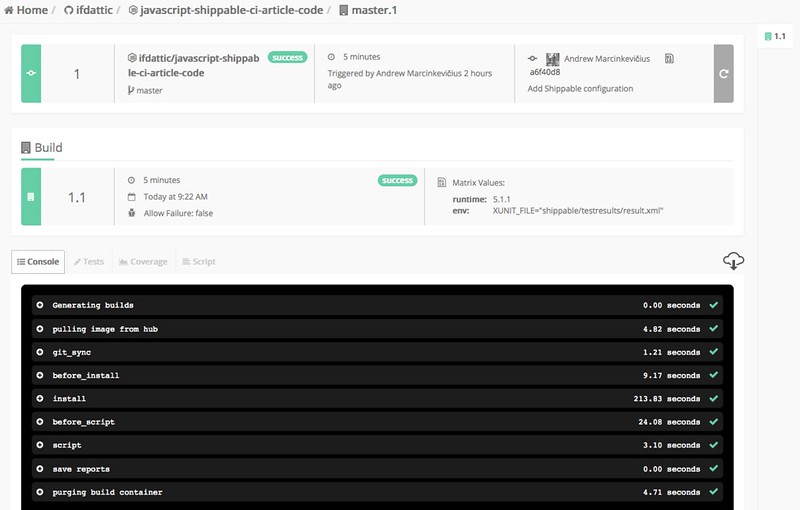
After it is done you can manually start a build or it will happen automatically the next time you will push a commit.
After a while a build should finish and you should get the similar view.
Code coverage
If you need code coverage for your code you can do it with Istanbul. Replace the shippable script in package.json with:
./node_modules/.bin/istanbul cover _mocha --dir shippable/codecoverage --report cobertura -- -R xunit-file
Conclusion
With these small changes you should have a CI testing for your application. It will improve your code quality and give you a piece of mind knowing that the changes you made will be tested even if you forgot to run the tests on your development machine.